Displaying your inventory locations on Shopify is a simple and effective way of driving more customers from your website to your local stores. By learning how to show inventory locations on Shopify, you will increase your store’s visibility, improve your inventory management system, and increase sales. This article explains how to show inventory locations on Shopify using Shopify’s built-in tool, as well as how to optimize your inventory location management using a Shopify app.
Benefits of Adding Inventory Locations on Shopify
Improved Customer Experience
When you manage a store that operates across multiple locations, having the ability to display where each store is and what inventory quantities are available at individual store locations is a great way to improve your customer experience. Imagine getting to a store and being told the item you want is in another outlet. This inconvenience can be avoided entirely by leveraging Shopify’s robust tools to enhance both the customer’s and the retailer’s experience.
Showing inventory location allows customers to shop in-store based on knowing that what they are shopping for is in stock or which location best suits their needs, improving their shopping experience. According to a Google survey, 46% of shoppers want to check if items are in stock online before they go to a store. Using an inventory location app directly addresses this and puts your store in a better position to gain and retain customers.
Increased Accessibility and Local Presence
Enabling inventory location management allows you to add store filters, provide directions, and show your customers their closest store, depending on location. This highlights your local presence and increases accessibility, a benefit for both you and your customer base.
Better Inventory Management
Showing your location inventory on Shopify is also a productive way to keep track of your inventory quantities across store locations and manage best-sellers, preferred stockists, and other useful analytics for store inventory management.
How Do I Add Inventory Locations on Shopify?
Anywhere that you physically stock inventory will count as a location in Shopify; this includes brick-and-mortar stores, pop-ups, fulfillment centers, or an app. Essentially, any location (physical or otherwise) that fulfills customer orders must be added as one of your inventory locations.
Inventory locations can be added to your Shopify store in a few simple steps. The level to which you can adapt and manage your multiple locations will depend on whether you are using Shopify’s built-in feature or an integrated app. Shopify’s built-in feature has limitations depending on what Shopify plan you’re subscribed to, whereas using a Shopify-integrated app provides access to more tools and better customization.
We’re going to break down how to add inventory locations using both methods so you can decide on the best inventory location management tool for your business.
Add Inventory Locations with Shopify’s Built-In Settings
To add inventory locations using Shopify’s built-in feature, follow these steps:
- Go to your Shopify admin dashboard.
- Navigate to the “Settings” menu.
- Click on “Locations” within the Settings menu.
- To add a new location, click on the “Add location” button.
- Enter the specific name and address for the new location.
- Select the type of location based on its use, such as:
- “Fulfill online orders from this location” for distribution centers or warehouses.
- “This is a retail store” for physical store locations.
- Save your changes by clicking on the “Save” button. Your new location(s) will now be added to your Shopify store.
Once locations have been added, you’ll be able to deactivate or delete them when required. You’ll then need to assign inventory to each location, which we’ll cover in the next section.
It’s important to remember that the number of locations that you can add will depend on your Shopify subscription plan. Shopify allows 10 locations to be added to its Shopify Basic plan and scales up to 200 locations with Shopify Plus. Using an integrated Shopify app removes this barrier, allowing unlimited store locations to be managed.
Add Inventory Locations with an Integrated Shopify App
Using an integrated app within Shopify allows you to add unlimited store locations, enhancing your visibility. It also lets you customize the customer interface to best suit your brand.
Introducing ProMap ‑ Store Locator
ProMap ‑ Store Locator offers a range of features to amplify your inventory location management, such as bulk uploads within a simple management system, instant store directions, categorized tags, and customizable interactive maps. Customers have rated it 4.8 out of 5 for multiple locations inventory management.
How to Install ProMap – Store Locator
- Go to Shopify’s app store.
- Search for “ProMap – Store Locator” and click “add app” to install it to your Shopify store.
- After installation, access the app from the “apps” section in your menu sidebar.
- Click on “ProMap – Store Locator” to open the dashboard.
- In the dashboard, navigate to the “My Locations” section.
- Here, you can manually add your stores one by one or use the bulk upload feature to add multiple stores at once.
- Change the status of your added stores to live to make them visible.
- Once completed, all locations will automatically integrate into your Shopify store and be accessible to your customers.
Limitations of Shopify’s Native Store Locator Settings and Competitors
Shopify’s native store locator settings limit the number of locations that you can add based on your Shopify subscription plan. In addition, competitor apps sometimes produce clunky and visually unappealing designs that may look out of place on product pages. ProMap’s user-centric design means users get a seamless and aesthetically pleasing integration, ensuring that the locator enhances rather than compromises the shopping experience.
When issues arise with apps, users expect to get prompt resolutions to their issues. However, this isn’t always the case with some store locator apps, leaving users waiting with slow response times and limited availability for tailored resolutions. ProMap’s exceptional customer support and customization capabilities mean users can rest assured that their issues, if any, will be promptly attended to and resolved.
Features and Advantages of ProMap – Store Locator
- Custom Store Tags: Differentiate one store from one another by adding custom store tags to each location. A tag will display key information about each store, e.g., products or available stockists, and can be filtered via the interactive map.
- Instant Store Directions in a Customized Map: ProMap – Store Locator will automatically detect your customer’s location and provide instant directions to their nearest store. Within the interactive map, you can also design it in a way that best suits your brand, with more than five Google map designs to choose from.
- Fully Customizable Design: Tailor the look of your store locator to perfectly match your brand identity. With the ability to add custom store images and unique pins to the interactive map, you can create a visually engaging and cohesive brand experience that resonates with your audience.
- Bulk Import Capability: Easily manage a vast network of locations by uploading over 500 locations at once through a simple CSV file. This feature streamlines the process of populating your store locator with all your physical locations, saving valuable time and effort.
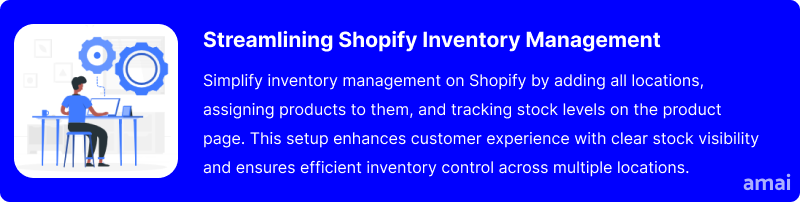
How To Show Inventory Locations On Shopify
Once you’ve added multiple locations to your online store, it’s time to learn to show inventory locations on Shopify. The first part of the set-up is the same, whether you added your locations directly into Shopify’s settings or used ProMap ‑ Store Locator.
In the product section of your online store, you will notice that every product is stocked at a location. By default, any new products will be stocked at all locations, so you will have to select where they are stocked if they are limited to a specific store.
It’s worth noting that all products need to be stocked in at least one location, and once an order or transfer has been placed for a product from that location, you won’t be able to unstock it despite being unfulfilled.
Managing Inventory From Multiple Locations
For products being fulfilled from multiple locations, you must manage inventory quantities at each store. You can do this from the product page, where you will control where it’s sold and the inventory quantities at each location.
There will be an inventory section for each product, as seen in the image below. The incoming amount refers to the inventory quantity being transferred to that location, and the committed amount refers to the orders that have been placed for the item. In the final column, marked ‘available,’ you will see the inventory quantities at each location.
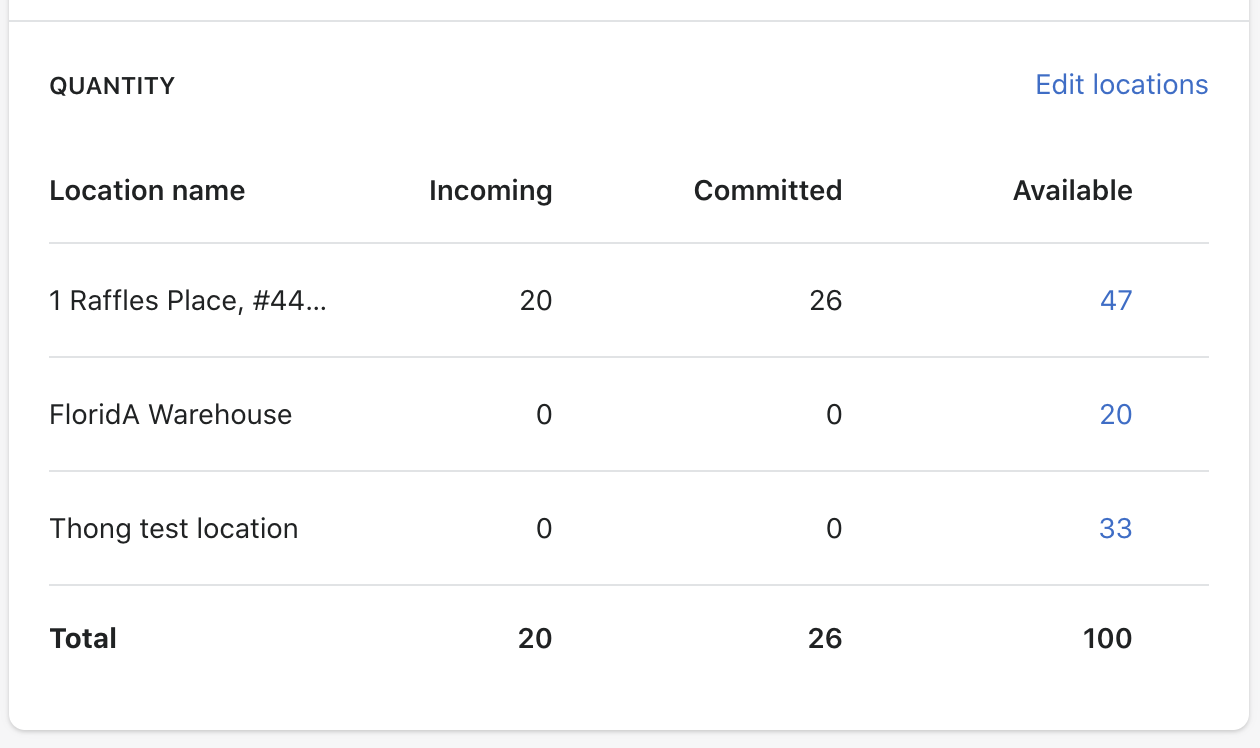
Within the inventory section of each product page, you can update the available quantities, enable tracking for each product or variant, and edit locations if your fulfillment locations change.
Useful Tips
- Offer local pickup or shipping options based on the customer’s proximity to inventory locations.
- Regularly review and update your inventory locations to reflect any changes in your storage or distribution network.
- Ensure your team understands how to manage inventory across multiple locations and the importance of accurate inventory tracking.
- Set up notifications for low stock levels at each location to prevent stockouts and manage replenishment proactively.

Summary and Advice
Showing inventory locations is a great way of improving the overall customer experience and managing your stock better. By following these steps and investing in an integrated Shopify app, like ProMap – Store Locator, you will increase your store’s visibility and improve your customer’s shopping experience.