Promotional code monitoring and generating reports to understand your sales campaign is a key performance indicator for any online store.
The good news is that Shopify provides helpful analytics, both with standard Shopify packages, as well as through discount and sales monitoring apps. These are available in the Shopify app store and have been specifically designed to make promotional code monitoring simple and effective.
The Bulk Discount Code Generator app allows you to easily create discounts and apply them throughout your online store, with a well-functioning analytics section to track sales and optimize your campaigns.
Benefits of Promotional Code Monitoring
Monitoring sales by Shopify discount reports will optimize your marketing efforts and allow you to target the most profitable consumers through detailed analytics. Promotional code monitoring will give you better leads, generate more sales, and improve your return on investment.
By providing insights into consumer behaviours and preferences, monitoring the traction of your sales campaign using Bulk Discount & Sales Manager is a key performance indicator for your online store and will lead to better decision-making when it comes to future campaigns.
In fact, a PwC report revealed that companies that are highly data-driven are three times more likely than their less data-driven competitors to see significant improvements in decision-making.
For a breakdown of marketing analytics and “how harnessing the power of data can enable you to make strategic decisions and feel confident in your marketing efforts”, read this helpful overview by Harvard Business School.
Ready to begin your understanding of marketing analytics? Our step-by-step guide to Shopify discount sales reports will make understanding the success of your promotional code campaigns easier than ever before.
Monitoring Promo Codes using the Bulk Discount App
1) Add ‘Bulk Discount Code Generator’ Shopify apps
Once you’ve logged into your Shopify admin, head to ‘Apps’ in the left-hand menu and search Bulk Discount & Sales Manager.
Click ‘Add app’ and it will appear in your Shopify admin dashboard.
2) Navigate to ‘Bulk Discount Code Generator’
Back in your admin section, you’ll find Bulk Discount Code Generator. Click on the app and you’ll be taken to your new bulk discount management dashboard.
3) Create a ‘Discount Rule’
Creating a discount rule directly into the Bulk Discount & Sales Manager is a simple way to create, edit, and manage discounts in bulk. You’ll then gain access to insightful analytics to improve your marketing campaigns.
For more information on how to create a discount, read our detailed guide on how to apply discounts with the Bulk Discount & Sales Manager.
4) Click on ‘Analytics’ in the top menu bar
After creating your different discount codes, you’ll be able to access promotional code monitoring from the ‘analytics’ page in the app’s dashboard.
You’ll see a breakdown of all your discounts, including gross sales, discounts, returns, and net sales. You can also set different timeframes to narrow down your promotional code monitoring data.
5) Monitor the progress of your promotions and sales report
Schedule time to monitor the analytics to keep track of the success of your active discount codes. This will lead to better decision-making and improved success for future marketing campaigns.
How to access coupon reports using Shopify’s in-built settings
You can also access coupon code monitoring without a specialised app. Using Shopify’s built-in settings for coupon code creation and coupon code monitoring is effective for basic use, but there’s a limit to what you can do with less versatile features.
If you’d like to use the built-in settings for monitoring sales by Shopify discount reports, follow the following four steps:
1) In Shopify Admin Panel go to Analytics > Reports
You may already be using the Analytics Dashboard to see your total sales, store sessions, and returning customers. The reports section provides store owners more granular data around sales, acquisition, and more.
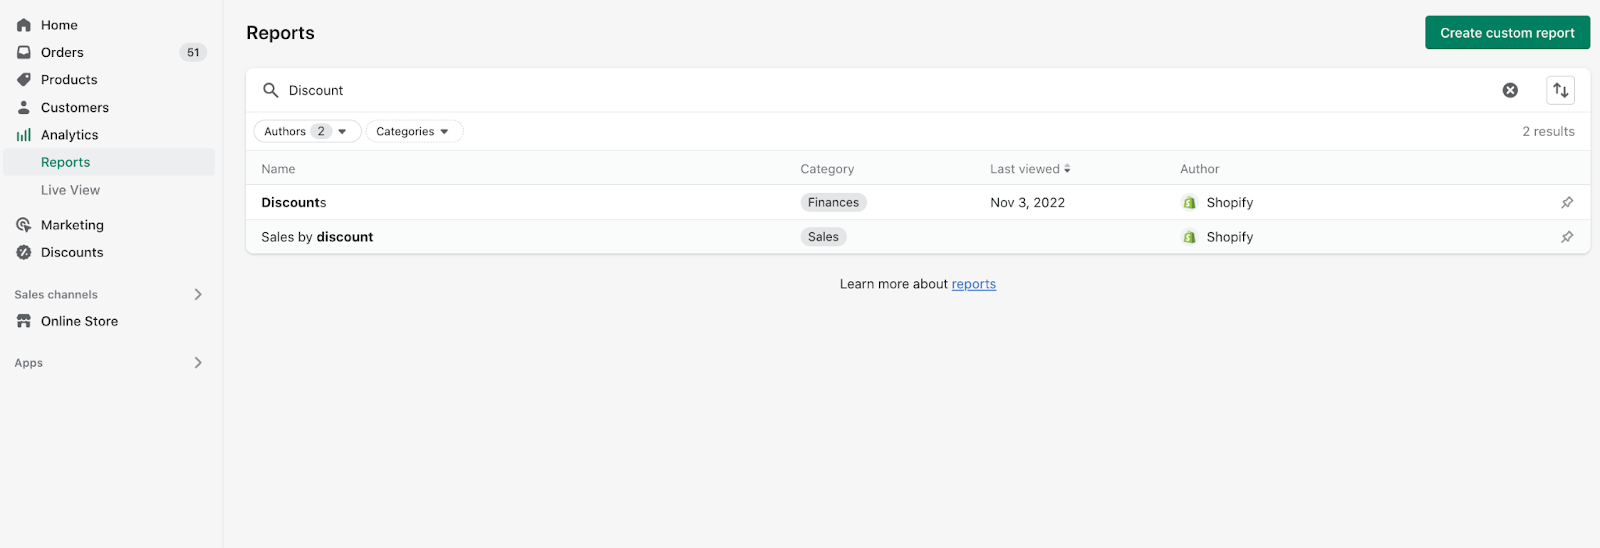
2) Search ‘discount’ in the search bar
You will be displayed discount options that have been curated by Shopify. These include ‘discounts’ and ‘sales by discount’
You can click on either report (or both) depending on the findings you’re looking for.
3) Select the date range for the report to be based on
Generally speaking, we suggest running sales campaigns for at least a week to gather enough data on what products customers are interacting with and purchasing.
4) Once the date range is selected, the report will be generated based on the date filters
Comparing the order quantity and net sales value to weeks with and without sales campaigns active is a good indicator of performance.
If your sales campaign didn’t see much traction, you may want to optimize your marketing efforts, or analyze other aspect such as discount products and pricing.
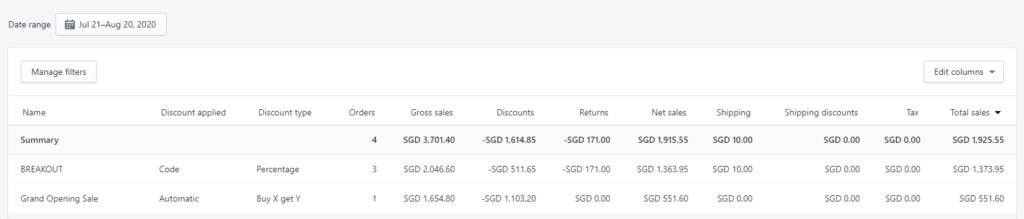
By default, the report will display the rows outlined in the image above, however, you can edit the columns as you wish. Moreover, here’s a description of what each column outlines:
- Name: The name of the discount. If the “discount applied” column value is showing as “code”, the name is the discount code. If the “discount applied” column value is showing as “automatic” this is the name of the sales campaign.
- Discount applied: Whether the discount was applied automatically or by entering a discount code upon checkout.
- Discount type: Percentage, fixed amount, free shipping, or buy X get Y.
- Orders: Number of orders that the discounts were applied to.
- Gross sales: Total sales that were made (before discounts). Cancelled, pending, and unpaid orders are included. Test and deleted orders are not included.
- Discounts: Total discounts value that was applied with the Discount Code or Sales Campaign.
- Returns: Total value refunded/cancelled.
- Net sales: Gross Sales – Discounts – Returns.
- Shipping: Shipping amount, not including shipping discounts
- Shipping Discounts: Value of the shipping discount
- Tax: Total value of taxes based on the discount code or sales campaign.
- Total Sales: Gross Sales – Discounts – Returns + Taxes + Shipping – Shipping Discounts
If you need to share the report, you can also choose to export the report into CSV format, simply click ‘export’.
Useful Tips
- It can take from 12 to 24 hours for the latest orders to show in the ‘discount by sales’ report, so don’t worry if some data isn’t visible yet.
- This report is a summary only. You won’t be able to see which orders are tied to the discount codes or sales campaign.
Frequently Asked Questions
Yes, you can stack an unlimited amount of Shopify discount codes when using a Shopify discount app. Try Quantity Breaks & Discounts and not only can you stack multiple discounts simultaneously, but you can also offer different types of discounts across your products (e.g. Shopify volume discount + free gifts). With Shopify’s built-in discount settings, you can have a maximum of 25 automatic discounts active on your store at one time. You can also combine a maximum of 5 combinable discount codes per order.
This information will be available in your Analytics section, accessed via Bulk Discount Code Generator or Shopify admin.
You will be able to customize the data that you see by filtering their data, edit their columns, and select different time ranges. You can also export your reports for analysis offline in spreadsheet programs.